---
# Quantum Computing: Implementing QSVM in IBM Q
**URL:** https://www.sigmoid.com/blogs/quantum-computing-blog-3-how-to-implement-qsvm-in-the-ibm-q-environment/
Date: 2020-10-15
Author: Sigmoid
Post Type: post
Summary: In our previous blog here we have explained the Quantum supremacy experiment. If you are not familiar with Quantum gates, QISKIT and...Read More...
Categories: AI/ML
Tags: Cloud Transformation, Data Management
Featured Image: https://www.sigmoid.com/wp-content/uploads/2023/10/Quantum-Computing-Implementing-QSVM-in-IBM-Q-banner-opt.jpg
---
In our previous blog [here](/blogs/the_quantum_supremacy_experiment/) we have explained the [Quantum supremacy experiment](/blogs/the_quantum_supremacy_experiment/). If you are not familiar with Quantum gates, QISKIT and different algorithms, its applications, and resources, I would recommend you to first go through the documentation of [IBM-Q](https://quantum-computing.ibm.com/docs/) and [QISKIT,](https://qiskit.org/documentation/index.html) for a detailed context. This blog is for all of you out there who are looking to get up-to-speed quickly on how to use the [IBMQ](https://quantum-computing.ibm.com/) and Qiskit library for running the quantum version of SVM (QSVM) on your computer. I will be talking about the Qiskit library and its uses in the coming sections.
## What is QSVM?
[Quantum](/blogs/whats-all-the-fuss-about-quantum-computing-and-quantum-supremacy/) Support Vector Machine (QSVM) is a quantum version of the Support Vector Machine (SVM) algorithm which uses quantum laws to perform calculations. QSVM uses the power of Quantum technology and quantum software to improve the performance of classical SVM algorithms that run on classical machines with CPUs or GPUs.
Quantum [Machine Learning](/blogs/5-best-practices-for-putting-ml-models-into-production/) takes on two major steps -in the first step classical data is converted to quantum data with computations on the quantum computer and in the second step, the computer converts the quantum result back into the classical format.
Let’s take a look at the different components involved in implementing QSVM?
Kernel trick – used for classifying the dataset into various classes using SVM, which transforms the data to find an optimal boundary between the possible outputs. Data that seems hard to separate in its original space by a simple hyperplane can be separated by applying a non-linear transformation function(known as **feature map**) in a space known as feature space. The Inner product for each pair of data points in the set is computed to assess the similarity between them and this, in turn, is used to classify the [data points](/ebooks-whitepapers/modern-data-architecture-data-lake/) in this new feature space (the higher the value of the inner product more similar they are to each other) and this collection of inner products is called the **kernel**.
Qiskit library – Qiskit is an open-source [quantum computing framework](/blogs/whats-all-the-fuss-about-quantum-computing-and-quantum-supremacy/) developed by IBM. Qiskit can be used to design and manipulate quantum experiments and subsequently run them on simulators on a local computer or real quantum computers on IBM Q Experience. Primarily it uses the Python programming language but it also supports Swift and JavaScript.
Qiskit consists of four foundational elements ([Source](https://qiskit.org/documentation/index.html)):
- Qiskit Terra: used to compose the quantum programs at the level of circuits
- Qiskit Aer: accelerates the development via simulators, emulators, and debuggers
- Qiskit Ignis: to address noise and errors
- Qiskit Aqua: used to build algorithms and applications
Installing Qiskit and accessing IBM Q
Here we explain how to code a quantum computer.
For installing Qiskit, to investigating the latest algorithms [click here](https://qiskit.org/documentation/getting_started.html)
IBM Q Account offers access to the most advanced cloud-based IBM Q quantum systems and simulators. It helps us to develop, run and monitor jobs/programs by making a stable connection between Qiskit and Quantum computers/devices. [Follow these steps](https://qiskit.org/documentation/getting_started.html) to set up your Qiskit environment to send jobs to IBM Q systems.
Qiskit framework consists of three high-level steps:
- Build: design a quantum circuit to solve the problem in hand.
- Execute: run experiments on different backends
- Analyze: calculate summary statistics and visualize the results of the experiments.
To get started with the basics of Qiskit. [Here](https://qiskit.org/documentation/getting_started.html) is documentation and video tutorials
Now let us see how the quantum algorithm actually works?
Firstly, superposition is created using the quantum circuit. After encoding and manipulating the information using superposition, we apply interference on the superpositioned states to get the final result.
## How QSVM works?
The implementation consists of three basic steps:
- Preprocessing that consists of Scaling, normalization and principal component analysis
- Generation of kernel matrix
- Estimation of the kernel for new set of data points (test data) for QSVM classification.
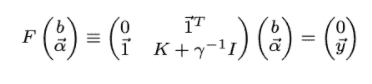
In the QSVM classification phase, classical SVM is used to generate the separating hyperplane rather than using a quantum circuit and here the quantum computer is used twice. First, the kernel is estimated for all pairs of training data, and the second time the kernel is estimated for a new datum (test data). Least-squares reformulation of the support vector machine is used to change the quadratic programming problem of SVM, into a problem of solving a linear equation system:
[Source](https://arxiv.org/pdf/1307.0471.pdf)
Where,
K is m×m kernel matrix and its elements can be calculated by

Y is a user-defined value to control the trade-off between training error and SVM objective, y is a vector storing the labels of the training data, So the only unknown parameter in the equation is a vector

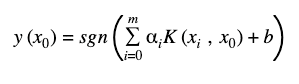
After calculating the Kernel matrix on the quantum computer, we can train the Quantum SVM the same way as a classical SVM. Once the parameters of the hyperplane are determined, a new data point x can be classified as
Where,
vector x with i = 1,…,m is the training data,
αi is the with dimension of the parameter vector α
## Quantum Algorithm’s parameter
Few important parameters that are specific to the quantum algorithms are:
- feature_dimension: number of features,
- depth: the number of repeated circuits,
- entangler_map: describe the connectivity of qubits [source, target],
- entanglement: generate the qubit connectivity {‘full’- entangles each qubit with all the subsequent ones and ‘linear’ -entangles each qubit with the next}
- feature_map(FeatureMap): feature map module to transform the data to feature space,
- Datapoints: prediction dataset
- quantum_instance (QuantumInstance): quantum backend with all execution settings,
- shots: number of repetitions of each circuit,
- seed_simulator: random seed for simulators,
- seed_transpiler: the random seed for circuit mapper
- QSVM: Quantum SVM method that will run the classification algorithm (binary or multiclass)
## QSVM on breast cancer dataset
I have applied SVM on the breast cancer dataset from the Python library Scikit learn both in the classical computer (Conventional SVM) as well as others using a quantum computer (QSVM) simulator in the IBM cloud and its quantum machine learning library Qiskit. The dataset collects information on 31 parameters that characterize a tumor, among which are: average radius, mean perimeter, mean texture, etc. and a total of 569 records.
A snippet of the code applied for QSVM on the simulator **(ibmq_qasm_simulator 32 qubits)** is shown below
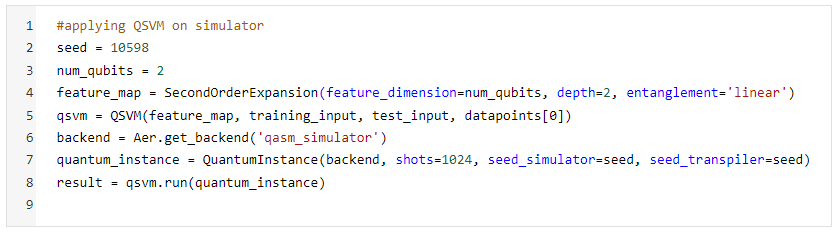
The only difference that we will see while running QSVM on the IBM Q environment (Quantum Computer) is that of the backend. IBM Q has 7 backends for running algorithms on real Quantum devices with different configurations in terms of the number of qubits (highest number of **qubits: ibmq_16_melbourne (14 qubits))**, their connectivities, error rates, and the type of gate available.
Here is the code for selecting the algorithm on the least busy IBM Q backend
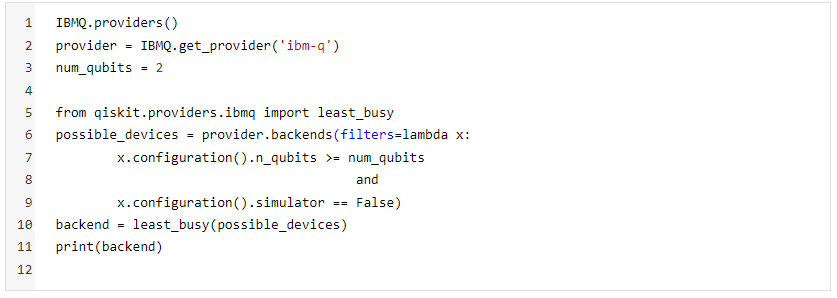
Four simulations were carried out. The first one was classical SVM with all the features, the second was classing SVM with 2 principal components, the third one was a quantum version of SVM (QSVM) on the simulator with 2 principal components and the last one was QSVM on IBM Q again with 2 principal components. This is done to be able to compare the results with each other and of-course the run-time for which the quantum computing and quantum algorithms are taking the limelight.
I will discuss the results of all these once it is ready in my next article in this series! Hope you enjoyed my work and start seeking new challenges within QSVM.
Did you find the article useful? Do you plan to use QSVM in any of your business problems? If yes, share with us how you plan to go about it.
## Sources
IBM-Q Documentation – [https://quantum-computing.ibm.com/docs/](https://quantum-computing.ibm.com/docs/)
QISKIT Documentation – [https://qiskit.org/documentation/index.html](https://qiskit.org/documentation/index.html)
[https://arxiv.org/pdf/1307.0471.pdf](https://arxiv.org/pdf/1307.0471.pdf)
[https://arxiv.org/pdf/1804.11326.pdf](https://arxiv.org/pdf/1804.11326.pdf)
[https://arxiv.org/pdf/1909.11988.pdf](https://arxiv.org/pdf/1909.11988.pdf)
## Authors
Amit Patidar is a Data Scientist at Sigmoid. He works with data and application of Machine Learning algorithms. Currently, he is focusing on Quantum Machine Learning, Recommendation Systems and Big Data architecture.
Assisted by – Bhaskar Ammu. He is a Senior Data Scientist at Sigmoid. He specializes in designing data science solutions for clients, building database architectures, and managing projects and teams.
[lc_the_tags]
## Featured blogs
[lc_get_posts post_type="post"
posts_per_page="4" orderby="date" output_view="lc_get_posts_mycustom_view" output_number_of_columns="4"
output_wrapper_class="row" output_article_class="shadow" output_hide_elements="Excerpt"
output_excerpt_length="0" output_excerpt_text="Read More" output_heading_tag="span"
output_featured_image_format="thumbnail" output_featured_image_class="card-img-left" ]
## Share
[addtoany]
## Subscribe to get latest insights
## Talk to our experts
Get the best ROI with Sigmoid’s services in data engineering and AI
## Suggested readings
[View all](/blogs/)

#### [The Quantum Supremacy Experiment](/blogs/the_quantum_supremacy_experiment/)
[Read blog](/blogs/the_quantum_supremacy_experiment/)
#### [What’s all the fuss about Quantum Computing and Quantum Supremacy?](/blogs/whats-all-the-fuss-about-quantum-computing-and-quantum-supremacy/)
[Read blog](/blogs/whats-all-the-fuss-about-quantum-computing-and-quantum-supremacy/)

#### [9 things you need to know about microservices](/blogs/9-things-you-need-to-know-about-microservices/)
[Read blog](/blogs/9-things-you-need-to-know-about-microservices/)
---
## Categories
- AI/ML
---
## Navigation
- [WordPress.org](https://wordpress.org/)
- [Documentation](https://wordpress.org/documentation/)
- [Learn WordPress](https://learn.wordpress.org/)
- [Support](https://wordpress.org/support/forums/)
- [Feedback](https://wordpress.org/support/forum/requests-and-feedback)
- [Sigmoid](https://www.sigmoid.com/)
- [Community](https://community.wpmanageninja.com/portal/space/fluent-forms/home)
- [Docs](https://wpmanageninja.com/docs/fluent-form/)
- [Developer Docs](https://developers.fluentforms.com/)
- [Documentation](https://imagify.io/documentation/)
- [Rate Imagify on WordPress.org](https://wordpress.org/support/view/plugin-reviews/imagify?rate=5#postform)
- [Manage](admin.php?page=litespeed)
- [Settings](admin.php?page=litespeed-cache)
- [Image Optimization](admin.php?page=litespeed-img_optm)
- [Company](/about-sigmoid)
- [Newsroom](/newsroom)
- [Life at Sigmoid](/careers)
- [Takshashila](/takshashila)
- [Contact Us](/contact-us)
- [AI Strategy Blueprint your AI advantage](/enterprise-ai-strategy/)
- [Generative AI Drive innovation with Generative AI](/generative-ai/)
- [Responsible AI Build trust with ethical AI practices](/responsible-ai-in-enterprise/)
- [Agentic AI Reshape business with scalable agentic systems](/agentic-ai-solutions/)
- [AI Managed Services Ensure reliable AI performance](/ai-managed-services/)
- [Advanced Analytics Transform your business with data-driven insights](/advanced-data-analytics-solutions/)
- [Start Assessment](/agentic-ai-readiness-index/)
- [Data Strategy Strong data foundations for scalable AI](/data-analytics-strategy/)
- [Data Management Leverage data as a strategic asset](/ai-data-management-services/)
- [Data Ops Automate data for speed and quality](/data-devops/)
- [Data Engineering Deliver insights faster with scalable pipelines](/data-engineering/)
- [Cloud Transformation Modernize data to maximise efficiency](/cloud-migration/)
- [Download Whitepaper](/ebooks-whitepapers/building-data-products-in-a-data-mesh-to-drive-business-value/)
- [Data Modeling Structure data for better decisions](/data-modeling-services/)
- [Data Visualization Transform data into actionable stories](/data-visualization-service/)
- [BI Migration Enhance decision making with modern BI tools](/bi-migration/)
- [Data Observability Build trust with healthy, accurate data](/data-observability/)
- [Automated Insights Make smarter decisions with auto-generated insights](/automated-insights/)
- [Download Whitepaper](/ebooks-whitepapers/power-bi-hacks/)
- [CPG & Retail End-to-end analytics for planning, operations, and commercial excellence](/industries/cpg-analytics/)
- [Life Sciences Trusted intelligence across clinical, commercial, and operational workflows](/industries/life-sciences/)
- [Financial Services AI-powered analytics for risk, compliance and customer experience](/industries/banking-financial-analytics-services/)
- [Read case study](/case-studies/data-clean-room-enables-real-time-insights-to-improve-operational-efficiency/)
- [MediaIQ Advanced platform for in-flight marketing measurement](/accelerators/sigmoid-mediaiq-multi-touch-attribution-tool/)
- [CampaignIQ AI-driven platform for optimized campaign budget allocation](/accelerators/sigmoid-campaigniq/)
- [AssistBot GenAI email assistant that automates human-like responses](/accelerators/sigmoid-assistbot-for-ai-email-assistant/)
- [CreativeBot GenAI tool for personalized and brand-aligned creative design](/accelerators/sigmoid-creativebot/)
- [SocialBot GenAI platform to analyze digital conversations and trends](/accelerators/#marketing|socialbot)
- [DemandIQ Predict trends accurately and optimize inventory management](/accelerators/sigmoid-demandiq/)
- [NetworkIQ Track and optimize logistics operations in real-time to quickly address disruptions](/accelerators/sigmoid-networkiq/)
- [SupplyIQ End-to-end platform to optimize supply chain operations](/accelerators/sigmoid-supplyiq/)
- [ProcurementIQ Automated procurement operations for maximum savings, compliance and efficiency](/accelerators/sigmoid-procurementiq/)
- [RapidML Accelerated deployment for machine learning models](/accelerators/sigmoid-rapidml/)
- [DataGuard Comprehensive platform for proactive data quality management](/accelerators/data-quality-tool-sigmoid-dataguard/)
- [CloudPulse Cloud cost optimization platform with multi-cloud management](/accelerators/sigmoid-cloudpulse/)
- [RAPID GenAI foundation with built-in governance and cost clarity](/accelerators/sigmoid-rapid/)
- [AnalyticsBot GenAI based platform to streamline decision-making in analytics](/accelerators/sigmoid-analyticsbot/)
- [DataConnect Seamlessly ingest, integrate and harmonize data from diverse sources](/accelerators/sigmoid-dataconnect/)
- [Reconica AI-powered data harmonization and reconciliation engine](/accelerators/sigmoid-reconica/)
- [ConverseBot GenAI driven insights generation for automated insights from reports](/accelerators/#sales|conversebot)
- [iNRM Cross-lever revenue growth optimization platform](/accelerators/sigmoid-inrm/)
- [AssortmentIQ Optimize shelf layouts and assortment mix at scale with AI-based insights](/accelerators/sigmoid-assortmentiq/)
- [Read Whitepaper](/ebooks-whitepapers/building-agentic-ai-chatbots-for-business-process-transformation/)
- [Listen Podcast](/events/podcast/how-jack-in-the-box-is-redefining-personalization-and-supply-chain-with-ai/)
- [Blogs](/blogs/)
- [White Papers](/ebooks-whitepapers/)
- [Case Studies](/case-studies/)
- [Podcast](/events/podcast/#Podcasts)
- [Read Blog](/blogs/the-genai-adoption-triad-responsibility-ethics-and-explainability/)
- [ConverseBot](/accelerators/#sales|conversebot/)
## Tags
- Cloud Transformation
- Data Management
---
## Footer Links
- [Talk to our AI experts](/contact-us/)
- [AI Strategy](/enterprise-ai-strategy/)
- [Agentic AI](/agentic-ai-solutions/)
- [Generative AI](/generative-ai/)
- [AI Managed Services](/ai-managed-services/)
- [Responsible AI](/responsible-ai-in-enterprise/)
- [Advanced Analytics](/advanced-data-analytics-solutions/)
- [Data Strategy](/data-analytics-strategy//)
- [Data Engineering](/data-engineering/)
- [Data Management](/ai-data-management-services/)
- [Cloud Transformation](/cloud-transformation/)
- [Data Ops](/data-devops/)
- [Data Visualization](/data-visualization-service/)
- [Automated Insights](/automated-insights/)
- [BI Migration](/bi-migration/)
- [Data Modeling](/data-modeling-services/)
- [Data Observability](/data-observability/)
- [CPG & Retail](/industries/cpg-analytics/)
- [Financial Services](/industries/banking-financial-analytics-services/)
- [Life Sciences](/industries/life-sciences/)
- [Case Studies](/case-studies/)
- [Thought Leadership](/ebooks-whitepapers/)
- [Blogs](/blogs/)
- [Company](/about-sigmoid/)
- [Newsroom](/newsroom/)
- [Accelerators](/accelerators/)
- [Careers](/careers/)
- [Privacy Policy |](/privacy-policy/)
- [Cookie Policy](/cookie-policy/)